November 10, 2010

Wash Machine Card - November 10, 2010

 The wash machine card was created using my cricuit to cut several different shapes, creative memories circle cutter, SU punches, and shaker card technique.  I also added some brads to create the knobs and buttons of the machine.  The door actually opens up (scored it and used tacky tape) so you can write a message inside to the recipient.

The clothes inside the washer are made of paper and material lace with some shiny bubble accents.

November 6, 2010

Scrapbooking Let It Snow Layout - November 6, 2010

Today, I woke up to weather around 35 degrees.  The first thing that came to my mind was snow.  We had so much snow last year, that I am hoping to avoid it this year.  I could actually enjoy one year without any snow.  I made this layout for a swap plus an additional one for my snow pictures from last year. 

Products I used:
Snow on bottom of page was stamped with 3 different stamps (Reflections, Unity Stamps and Hero Art).  I cut the white paper to look like snow drifts using the creative memories cutter.  The Cricuit was my best friend in this creation: Snow Friends for the Snowman, Joys of Season for the large green snow flake and the red snow flake, Winter Frolic for the blue snowflake, Title and journaling box.  A little ribbon from Michaels and a touch of stickles makes this creation complete!

October 30, 2010

Happy Halloween - October 30, 2010 - Glizty Lace Card

A Glitzy Lace card is fun to create.  The spider web lace was purchased at JoAnns.  The glitter is Martha Stewart Amethyst and Onyx.  You might be wondering, how do I make a card with lace and glitter?  It is so simple.

  (1) Your Supplies: Two Sided Sticker Paper from CTMH, Glitter, Lace and a Brayer.
  (2)  Peel one side of the sticky paper covering away and stick the lace on the sticky side.
  (3) Then sprinkle your glitter onto the lace - covering all of the lace.
  (4) Next lay a sheet of paper over the glitter and roll your brayer over the paper helping the glitter to stick to the sticky paper.   On the sample, I used purple glitter.
  (5) Next tap off the excess glitter, refill your glitter bottle and peel off the lace.
  (6) Next add your second layer of glitter onto your image, put the paper back over top and brayer it down.  On the sample I used black glitter to enhance the spiders and web. 
  (7) Tap off the excess glitter - and now you have a lace image for your card.

Spooky ---- Happy Halloween!!!

October 27, 2010

Magnolia Kit Day - October 27, 2010 & SC304 Challenge


Magnolias, don't you just love them?  I sure do!  I received these 2 kits in the mail from a secret sister.  I decided to use these kits for the SC304 challenge this week!  I colored them using a combination of items: copics, watercolor pencils, chalk, and blender pen.  Unfortunately, I do not know the names of the designer paper or the Magnolia images.   

October 19, 2010

October 19, 2010 - Flip Flopping Birthday - SC302 Challenge


My Mother-in-Law loves to wear flip flops.  I think she wears flip flops year round.  For months, I have been contemplating her birthday card.  I wanted to make it something personal just for her.  When I saw the SC302 challenge it was a perfect match for my idea.  I used designer paper from DSWC, SU Orange, and YoYo Yellow, a blue piece of velvet paper for the background and some super cute flip flops.  My husband had these cute little shells in his shell bowl that I used as embellishments for the cards.  Do not worry, I got his permission.  I made up the saying "Have a flip-flopping birthday!"   I hope she enjoys her card and her birthday!

October 4, 2010

Challenge SC300 - Country Girl - October 4, 2010 - WINNER


I just love this image by Sarah Kay "Spring Blossoms".  A little country girl goes out and picks some beautiful flowers for her mother.  This is the card that I entered into the SC300 Challenge.  I love polka dots, so of course her hat has dots, the paper has dots and so does the flower.  I added the buttons for two reasons (1) to look a little polka dotty and (2) buttons go with a country girls blue jeans.  When I see this card, it just makes me smile!

I just found out today (October 6, 2010) that I happened to be one of the winners of the challenge!  I am so excited!  This is my first win ever on a challenge!

October 2, 2010

Who's That Girl Well Read - October 2, 2010


I just love this new WTG Well Read Stamp Set.  I had the perfect leather looking paper that I found at JoAnn's to stamp and mask the couch.  The SU Designer paper made great wallpaper.  The rug was made by cutting a circle in half, coloring it with my pink copic marker, and then fun flocking it.  I decided to stamp Hello on the book as a greeting to the recipient.  Of course, I used a metal tag as a frame and a piece of fun flocked black paper for a designer picture on the wall.

September 11, 2010

Christmas Tag - September 11, 2010


Today, my project was to make Christmas Tags.  This year, I am going to try and make homemade tags for my Christmas gifts.   This is my first tag which features a Christmas Tree and tag shape from the Winter Frolic Cricuit Cartridge.  I embossed the SU elegant eggplant cardstock with my ornament cuttlebug embossing folder.  I sponged the To & From Tag with the colors of the tag and topped off the tag with the CTMH Winter Cozy ribbon.  This ribbon really feels cozy and soft!  The base of the tag is 5 1/2 inches.  The elegant eggplant of the tag is 5 inches.  The Christmas Tree was cut on a 2 inch scale.  Only 105 days until Christmas!

September 6, 2010

September 6, 2010 - Baby Rattle Card Take 2

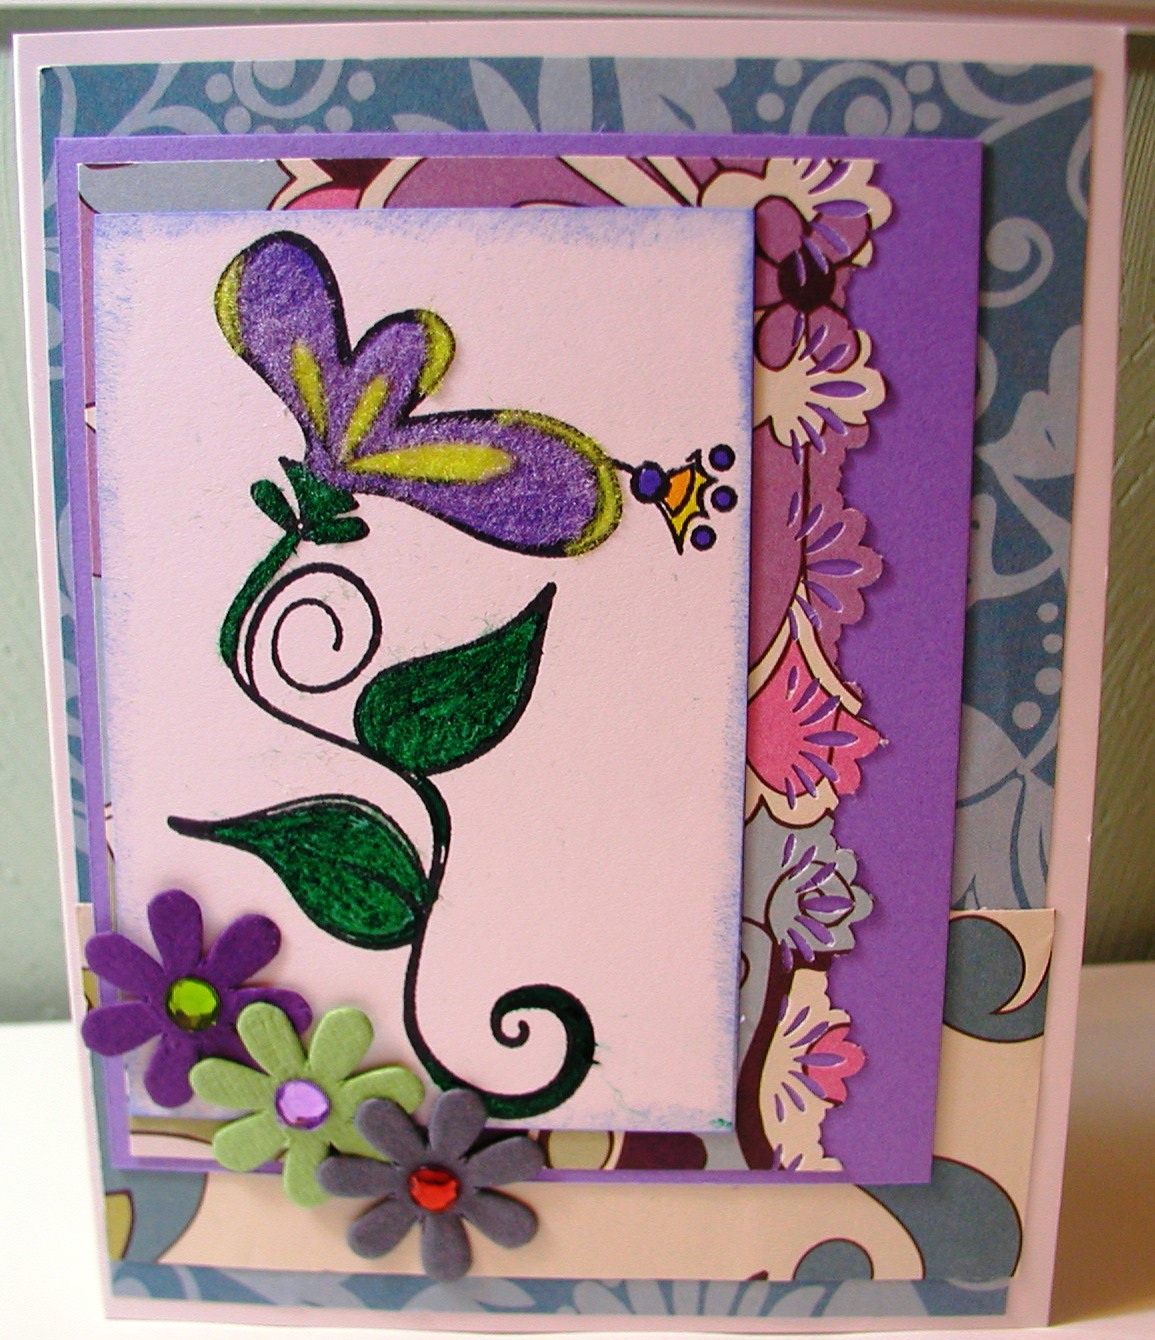
Take 2 on my baby shaker card.  I joined a swap for specialty cards and my contribution is 4 baby shaker cards.  I just love how this turned out especially since I used my cuttlebug to make the adorable background.  I also made this card not gender specific so that the recipient can use it for a boy or girl.
Directions:
1.  Make a 4.5 x 5.5 card out out of white card stock.
2.  Cut a sheet of purple paper 4.5 x 5.5 and run through cuttlebug for the embossed image.
3.  Handle is 1 inch wide.  The length of the handle will be determined by you.
4.  Circle for Handle is 1 3/8 punch circle with a small circle punch for the center.
5.  Cut out 2 circles using transparency paper.
6.  Cut out two round circles of the same size as the transparency paper.
7.  Cut one circle in half to make the bottom piece of the rattle.
8.  Cut a circle within the other circle to make the out edge of the top part of the rattle.
9.  Use adhesive to adhere the half circle and decorate circle on one of the transparency circles.
10. Cut a ribbon to go across the circles.
11. Glue on a button with a glue dot.
12.  Turn decorated transparency paper over and  adhere (using only one side) with double sided (without leaving a gap) in small pieces around the clear view mirror.
13.  Fill with small buttoms.
14. Remove backing from double sided foam tape and adhere to other transparency circle.
15. Glue pieces together on front of card using Terrifically Tacky Tape.

September 4, 2010

September 4, 2010 - Card Kit Swap Creation & SC72

I received the layers of paper and image from a card kit swap. You use the card kit to make your own card.  I decided to go back and look through the challenges on splitcoaststampers.  I used SC 72 challenge.   I do not know the name of the image.  However, I thought the card had to be shared because it was bright and happy.  I added the flowers and rhinestone for some extra pop!

August 18, 2010

Hoppy Birthday - August 18, 2010

I made this card for my niece who is turning 5 today.  I really enjoyed fun flocking the SU Unfrogettable frog.  He really looks like he is celebrating her birthday.   My first time at making a card for a child!  It makes me want to be a kid again!

August 16, 2010

Love Ya - August 16, 2010


When I visited Archivers, I picked up some Black Fun Flock and decided to create a I love you card for my husband from an image I received in a swap.  I left it on his pillow so he would find it before he went to sleep.  I used one of the sketch challenges SC290 from splitcoaststampers

August 14, 2010

Gift Bags - August 14, 2010


I held a crop at my house.  I wanted to give the ladies something sweet!  We call our group the "Queen Bees"!  My friend, Stephanie, let me borrow her Honey Tilda Magnolia Stamp.  I watercolored and added stickles to the image.  The gift bags were black so I stamped them with a bee stamp from SU with gold pigment ink.  I added black bees to the ribbon using Stazon ink.

Birthday Card - August 14, 2010

This card is serving a double purpose: birthday card and the Sketch Challenge 293 at Splitcoaststampers.
For the challenge you had to use a decorative board to the one side of the card and a certain layout.  I had a great time with the CTMH stamp set Simple Beauty by fun flocking the flower with yellow and purple and fun flocked the leaves and stem green.  Added some extra flowers for a little embellishment that pulled out the three colors in the paper.

August 13, 2010

New Job - August 13, 2010


I have been making cards over the past few years for my step father using this truck from Stampin Up Loads of Love set. For one year and every holiday, I sent a card with this truck on it. Now, as a few years have passed, I try to make a card every once in awhile that has his favorite "truck". Today, we are celebrating the fact that my step father landed a cool new job. It is a great a way to use a card to express his journey to the next place with an interstate sign that says "Way to Go" and "Congratulations" inside.

July 10, 2010

July 10, 2010 - Tilda with Ladybug

Tilda with the Ladybug is just so adorable and sweet!  I paper pierced her dress and the pockets on her dress.  I used copics to color her and make the mud puddle.  Added some sponged blue background and yellow sun.  She looks like she has been out saving the ladybugs!

July 5, 2010

Pampered Swap - July 4, 2010

I am in a pamper swap.  The pamper swap required you to have one recipe card for a pampered items.  My recipe was bath salts - an idea I am going to use for Xmas presents.  You had to have an inspirational card and a couple of pampering items: emory board, face mask, bath sponge and the bath salt sample that I made.

May 22, 2010

Got Messages DVD Tin - May 22, 2010

Since being a small child, I have loved the telephone.  I grew up with rotary phones and watch push button phones gradually take over and now the rave is cell phones.  Using a DVD tin, I created a rotary dial telephone with making memories clear page pebbles.  The telephone was cut out with the Cricuit Cartridge "From My Kitchen" and the letters are also cut out with the Cricuit "Printing 101".  The paper is CMTH Designer paper and SU Cardstock.  I played off of the pun "Got Mail" and went with "Got Messages" since the phone looks like it is ringing off the hook!

Special Delivery - May 22, 2010

I noticed that I have not been on my blog for almost a month.  The calendar in my craft room was still on April, so now I am officially crafting in May.  This month, there has been a two births and a baby shower that required card making.  My husband's life long friend, Michael, had a baby boy and we will send out this baby carriage card to him and his wife this month. 

How to make the carriage:
Cricuit Accent Essential  Cartridge
  For the solid Blue, I cut (1) 5 1/2 circle and (2) 1 1/2 circles.
  For the pattern paper, I cut (1) 5 1/4 circle and (2) 1/4 circles.
  I laid a piece of paper over each of the large circles and drew 2 sides of a square.  I cut out the square to make the open  part of the carriage.
 I used a border punch to decorate the top of the carriage.
I used white ribbon adhered with adhesive across the carriage and 2 buttons to accent the wheels.

Special Delivery - Cut using the Wild Card Cricuit Cartridge.

April 28, 2010

Can you please give me the recipe? April 28, 2010


I joined a swap on Splitcoaststampers called "Can I have the Recipe Please...??..The one everyone always asks for!" The due date for the swap is June 30, 2010, so if you want to sign up there is still time.  I have been playing with my cricut cartridge "From My Kitchen" today and it has been so much fun!  That is how I made my embellishment which is the oven.  It reminds me of one of those retro ovens from the 1950s that I would love to own in my kitchen.

April 17, 2010

Recipe Card & Swap Card - April 17, 2010

Back in my craft room enjoying making cards for a multi-card swap and recipe cards for a grillin swap.  I had a great time making both of these items.


The card is made from an MFT chillin out image that I received in another swap.  I thought since the tub was dotted that dots should be the theme of this card.


My grillin recipe cards actually turned out to be a fun project.  I joined this swap since my husband and I love to grill out.  We have been grilling out since we dated.  I choose one of our favorite recipes "Savory Grilled Potatoes", used my Unity Stamp "Here's What's Cookin" along with designer paper from DWCV which looks like decking board to me, and the grill was created using In the Kitchen cricuit cartridge.

April 11, 2010

Checkbook Covers April 11, 2010


I made 4 of these checkbook covers for a holder swap that I am currently participating in.  The longest part of the entire checkbook cover process was deciding on a design.  I went back and forth for 2 hours until I finally came up with this cover.  I hope the ladies enjoy them.  I just love the butterfly embellishment!

March 21, 2010

Purse - March 21, 2010


My good friend, Stephanie, sent me a Martha Stewart scoring board as a cheer-me-up gift!  Well, the cheer-me-up gift really worked because I had been wanting a scoring board so I could make many projects.  The first project that I just had to make is this adorable purse.  It is a great size to hold a candy or some sort of treat.  Thanks Stephanie for the scoring pad..... look for many more projects to come.

March 18, 2010

Plant the Seed Swap - March 18, 2010


For this swap, you could pick to do a vegetable seed or flower seed gift bag.  I choose to do both.  For either the vegetable or flower seed swap, you made 1 altered plant stake, a recipe card with embellishment, include a small gift in the bag (gloves, pen, or altered items, etc.) and made a topper for the bag.

I believe this has been the most fun creative swap I have done in quite awhile, if ever!  My vegetable bags include a great recipe for broccoli salad with broccoli seeds, of course.  I made these adorable caterpillar toppers with my Cricuit from the Walk in the Garden cartridge.  Included in each bag are altered note pads and altered plant stakes made using laminated coasters, stickers and ribbon.

The flower swap has a great breakfast casserole recipe, a cute jumbo pen and Gailllardia flower seeds.  I altered the plant stakes with cute ladybugs.  I used the border topper of ladybugs from the Cricuit machine to make the toppers across the bag.  Maybe what I enjoy most of all about this swap is making the toppers - my husband thought they were adorable. 

March 13, 2010

Secret Sister Altered DVD Tin - March 13, 2010


I am currently participated in a secret sister swap where you altered six items.  In return, you receive six unique altered ideas.  I love these types of swaps since people are so creative and make such unique things that provide you with new ideas and projects to try yourself.

I altered a DVD tin so that she can write down ideas for swaps.  The stamped image is Stamping Bella's Clickabella since we all talk via the computer and participate in the swaps through the computer. To make the DVD color coordinated, I used two sided designer paper.   The fron cover of the DVD tin is cut 5 1/4 x 7 1/4 and rounded with a corner rounder.  The inside flap is cut 5 1/4 x 8 1/2, scored at 1 1/4 inches.  Then I cut another small piece of the designer paper, used sticky strip to make the pocket by adhering the small piece of paper to the scored folded over flap and some sticky strip on the sides.

The letters were cut out using my cricuit and the Plantin Schooolbook Roly Poly letters at 1 1/2 inches and quickly adhered with the Xyron machine.  This was a fun relaxing project.

February 26, 2010

SplitcoastStampers VSN Winter Olympics Challenge - February 26, 2010


Tonight, I participated in the SplitcoastStampers VSN Winter Olympics Challenge.  The 9:00 pm. card challenge was called snow blind.  You must create an all white card - and you can have just a hint of color.
You had only 45 minutes to come up with your idea and make the card.  I was able to do this challenge and make a mother's day card for my new mother-in-law.

February 20, 2010

Re-Created Easter Cards --- February 20, 2010


Have you ever created a card in the past, that you just had to make better?  Well a couple of Easter's ago, I created a card similar to this one.  I decided to go back to the drawing board and spice it up a bit.  When Easter gets here, I will give these cards to the girls at work along with a bunny treat (chocolate, of course)! 

This card is in honor of my grandmother, who was a great crafter of her time. She use to make adorable decorated "real" eggs with a scene inside. This card is to honor her memory in making those eggs because every time I create this card I think of her.

How I made the Card
I broke out my Creative Memories Cutting System and used one of the ovals. One oval is cut with the Doodlebug Purple Sugar Coated Paper and I could cut the small oval on this part of the Egg.  The second oval was Papertray Ink white paper.  Using a solid white oval allowed me to create the background.   Double Stick Foam Tape (or pop up dots, if you prefer) allows the egg look like it has a 3 dimension. I popped up the bunny and the chick and added a little stickles for some extra sparkle.

Supplies:

Stamp Set: SU Bunny Hugs
Markers: Copic and SU
Paper: Doodlebug Purple Sugar Coated Paper; Papertray Ink White, SU Pixie Pink; DCWV Designer Glitter Paper.
Accessories: Ribbon, Pop-up Dots, Stickles

February 13, 2010

Love Me Do Blog Hop - February 13, 2010

Stamping Bella is hosting a Love Me Do Blog Hop today you can start right here at Stamping Bella blog.  I made this card to celebrate the thing women love the most, Sweets!  What better way to celebrate something sweet than with Craveabella!  She is relaxing loving her ice cream while dreaming of cupcakes!  If you are enjoying all of this fun, then you need to hop over to Maria's blog for some more Love Me Do creativity.  Thanks for hopping by!

February 7, 2010

Hopefully, Drying Out from the Snow Storm - February 7, 2010

Every weekend here in Virginia, we have been having snow, snow, snow!  This weather is very unusual for us.  When I saw this digital image on The Stamping Boutique's website, I just knew it would make the perfect card after the all of the snow was over. 
Stamps: The Stamping Boutique Snowman-Laundry-Line
Paper: SU Bashful Blue, SU Green Galore, and SU White
Accessories: Cuttlebug Embossing Folder, Ribbon, Snowflake, Mini-Clothespins, Liquid Applique, SU Dazzling Diamonds, Glue Dots, hole punch, snowflake button, heat gun, SU Black Marker, PrimsaColor Watercolor Pencils and Blender Pen.

First, I printed out the image and careful cut out the clothes line.  My secret is I use a hole punch to make a few holes so I can cut the inside of the image out.  I colored the clothes line with the black marker to make it thicker looking.  I placed the clothes pins over the images clothes pins.  I used liquid applique and the dazzling diamonds to make the snow at the bottom of the card.  You layer on the liquid applique, sprinkle on the dazzling diamonds and heat with the embossing gun.  Glue dots hold the image in place especially the clothes pins, ribbon and the snowflake on the ribbon.  I used scissors that are resistant to glue, to cut the glue dots in strips to place on the clothes pins.  I printed out the sentiment from the computer.

What's Cookin????? February 6, 2010


What is cookin in my life :  Well today, I am celebrating being alive for an additional 23 years.  When I was 15, I almost died because my spleen ruptured.  I spent the day doing what I loved - Crafting.  As I looked through the Splitcoaststampers gallery, I was inspired by the beautiful paper piercing. In my box of stamps, the Stamping Bella daisy oven stamp was begging me to use it.  My friend, Stephanie, had given me this great sentiment stamp from Unity Stamps.  The two images paired well together and make a great card just to write a note to a friend.  My inspiration for the colors came from the daisy ribbon.

Stamps: Stamping Bella Daisy Oven; Unity Stamps Here's What Cookin
Paper: Papertray Ink White Cardstock (base), SU Lavender Lace, YoYo Yellow, Green Galore and Only Orange.
Technique: Paper Piercing

February 6, 2010

Dreaming of a Spring Day - Even if it rains!! LSC258 Challenge February 5, 2010

Today, I woke up to the snow pouring outside of the craft room.  As the day progressed, I saw freezing rain for several hours and watched it changed back to snow!  The only relief to being house bound weekend after weekend is kicking back in my craft room.  I decided that today, I would bring a little spring into my day - even if it rains.  SCS had a great challenge for framed art.  I did not have a frame and could not go to the store because of the weather, so I created this bright cheery spring card.

Stamps: SU And Everything Nice and SU Beyond the Basics
Accessories: Watercolors, Rhinestones, Stickles
Paper: Papertray Ink White Card Stock for Base (my favorite), SU YoYo Yellow, Blue Tempting Turquoise

January 30, 2010

Inspiration Challenge 217 ~ Espe January 30, 2010

I decided to participate in the Inspiration Challenge 217- Espe.  My inspiration was a wallet.  
My Supplies:  SU Bermuda Bay, Basic Black and YoYo Yellow; Papertray Ink White
Ribbon, Versamark Pad, 1.90cm Square punch, and some other designer papers for the bags she is holding.
The stamp sets are SU I like your Style and CTMH Ms. on the go.  I had a great time making this card and finally getting to use my CTMH stamp set that had been sitting in the closet for at least a year.

January 28, 2010

Mo's Digital Pencil Image - Patience January 28, 2010


I made this adorable card for my mother-in-law.  When she was a little girl, she use to dress up her cats and push them around in the carriage whether they liked it or not.  When my husband and I saw this image, he laughed and laughed because it reminded him of her story.  We decided to color the cat orange and yellow like our cat Clyde.  We are going to send her the card next week from Clyde to add a little cheer to her day!  I also plan on making another one with different colors to send to my mother from Clyde also.  Everyone needs a card from the "grandcats"!

January 27, 2010

SC265 Sketch Challenge


Today, I participated in the SC265 Sketch Challenge.  The hostess, Cindy Coutts, came up with the basic design of the card.  The challenge is for you to use a stamped image and create a card with the basic layout.
I decided to use Stamping Bella Knitabella stamp as my stamp image.  I had been meaning to make a card with this stamp for a few months for my mother who is a great knitter.  I used SU Gable Green as my card base, SU pixie pink, SU watercolor paper, and designer paper by me & my BIG ideas.  The embellishment is Winter Cozy fibers from Close to my Heart, and and adorable button from K&Company.  Inside the card states "knit happens".  I hope to send this card off in the mail to my mother tomorrow and that when she receives it, it will brighten her day!

January 24, 2010

Melani is Celebrating her 33rd birthday! January 24, 2010

Melani is celebrating her 33rd birthday and giving away blog candy!  She creates some of the most beautiful cards that I have ever seen.  Her cards are inspirational and they are very professional looking.  Please go visit her blog - I think you will enjoy her work.  Melani's blog

Valentine Day's Gifts for the Girls at Work


I made these gifts for the women at work.  I thought it might be nice to come into the office and find something on your desk.  These gifts were simple and quick to make.  I used the Stampin Up Yummy Stamp Set.

January 2, 2010

Christmas Card for 2009


These are my Christmas Cards for 2009. Everyone who received a card seem to like their card. I had to make several different cards because I did not have enough paper for all of the cards. The cards took a long time to make because of all the different steps but in the end, I think it was well worth it.

January 1, 2010

Husband's Card to Me for Christmas 2009


I woke up on Christmas morning to find that my husband had made me a card for Christmas from one of the Bella stamps he got me. I think he did a great job making this card which took him about 3 hours. I love all the bling! What I love most of all, is how much he loves me and took the time to make me a card. He is wonderful!